
Zodes woke me up around 2 am to be let outside for a bathroom break. I opened the door and the temperature took my breath away so I checked it on my phone.
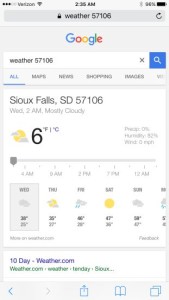
Note what the forecasted temp is supposed to be… 25 degrees, only off by a few… While it’s cold it’s NOT 6!
We were toasty warm though thank goodness to a little pre-planning and preparation. I knew it was going to be cold at places I was going to be visiting and possibly staying during my over the road adventures. I had also learned that my factory Suburban furnace is very inefficient (60% at best) and I had already gone through a few external 7 gal propane bottle refills in a matter of two nights at 25 bucks each during a cold snap. Something had to be done about my heating situation because I like to be comfortable but not broke buying all that propane.
Something had to be done about my heating situation because I like to be comfortable but not broke buying all that propane. The answer I discovered was the very efficient vent free heating option described below.
I researched this topic and found the Big Buddy Heater to be the best value for my dollars and time BUT, I did not like having a 5 lb propane cylinder floating around the interior to feed this thing (during my testing phase I knew this wasn’t going to work out and running an extension hose outside wasn’t going to work for me either). Through more investigation I found that I could tap into my supply line without much difficulty and that it will feed my vent free furnace just fine. NOTE: My motorhome gas supply after the regulator is a high volume, low-pressure supply line – which is perfect for this application. No need to buy Big Buddy regulator adaptor, etc…
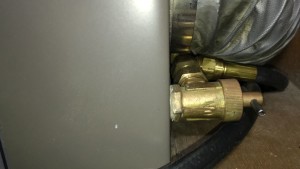
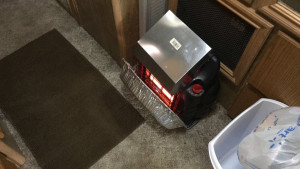
I installed a tee-fitting to the supply line right at the factory inefficient furnace so I could fuel my very efficient Big Buddy IR vent free heater inside the RV.
This heater has three settings and until this day I have not ever needed it set to high (18,000 BTU) for any length of time. With it ‘plumbed-in’ and having a bypass switch on my thermostat to control my furnace fan manually for air circulation, We stayed nice and toasty all night long.
Ok Here’s the scoop:
The tee is installed into the original copper propane supply line feeding the factory installed Suburban furnace.
The hose coming off the tee is the 12′ big buddy adaptor hose with the quick disconnect fitting. I have the extra hose looped in the bottom space under the closet for easy deployment to any area of the motorhome I need. This was an overkill as I have yet to move it anywhere – just have not needed to even during single digit days.
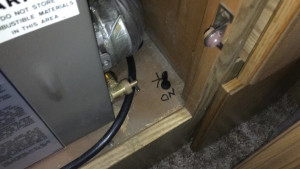
The gas valve in the image is the factory shut off valve on the Suburban furnace. With the intake screen in place, I can actually turn that valve on and off with my fingers through the bottom opening. Your valve placement and accessibility might be different. This is the same reason I placed my thermostat bypass switch next to the gas valve. I can manipulate both easily without removing anything and nothing shows as being ‘modified’ on the outside.
NOTE: The bypass switch is so I can manually turn off the gas being fed to the furnace and still turn the fan on at will for air circulation without having to have the furnace on (to reduce battery consumption while off grid). I have upgraded my old mechanical thermostat to a digital one but could not control the furnace fan separately. I made my own bypass.
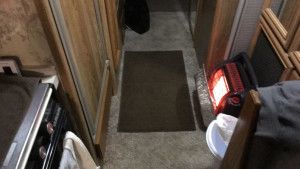
The foil roasting pan you see in the image was a quick fix to reflect heat back toward the furnace intake and keep the Big Buddy from making my refrigerator door scalding hot from the IR heat it produces. It worked so well, I have not upgraded that particular improvement yet…
ADDED Note: I have the Big Buddy Heater sitting on/inside of a double wall baking tray to keep the bottom and carpet cool even though you cannot see it in this image.
Three things to know:
1) Is safe for inside use? Yes. The Big Buddy has a built in oxygen depletion sensor shut off device and a tip over detection sensor. This will shut down the unit in the event there is not enough ventilation to keep oxygen levels at 18% (min) or the unit is accidentally tipped over (by a pet for example). I’d suggest you have a backup CO/smoke detector in your motorhome. I do not want anyone falling asleep forever in mine.
2) It sips propane in comparison to the regular furnace BUT the heat this heater produces has a very high concentration of moisture. H2o (water) is a direct result of propane combustion. You have to have some ventilation open and even then your windows will sweat on the inside. Ensure your window drains are clear.
3) 18,000 BTU will run you out of your motorhome unless it’s 6 degrees outside.On high, with the propane hot water heater on and the Suburban furnace on, the gas supply cannot keep up with all three
UPDATE: By accident I discovered that with the Big Buddy on the high setting, the propane hot water heater on (actual burner running heating the water) and the Suburban furnace on, the factory gas supply cannot keep up with all three. One has to be turned off (or, at least, the BB down to middle setting) or the hot water heater turns itself off. I did not test with the oven on (yet), but with BB on high and the hot water heater (actual burner running heating the water) the stove works just fine with all 4 burners on.
One last Note to share: I have a “redirect register” that I can put on top of the unit to basically direct all heat back into the fan intake of the Suburban furnace. It works well but tends to make my closet floor very warm so for the most part I leave it off and it still works out great!
BONUS: I did forget to mention above that I do have reflectix in all windows. I remove the windshield cover during the day to see the beautifulness outside but when I know it’s going to get cold (or is cold) I install it before going to sleep. It takes about 3 minutes but keeps it dramatically warmer and much more temperature stable inside.
I purchased a roll at home depot 48″x25′ about 40 bucks and took a few hours cutting out and fitting each window.
One roll allowed me to fit all windows in my 33′ class A.
If I was making them again I’d start with the windshield first as that will be the biggest section used out of the roll. Last time, I started by cutting a section slightly longer than the measured width for my windshield glass section as measured on the outside. I knew this would give me more than enough to trim off excess when placed against the glass on the inside. I centered the over-sized piece in the center and marked where my rear view mirror is located and created the slot in the reflectix to allow the mirror to poke through. Then I trimmed around the edges accordingly to fit nice and snug. I actually have to push the edges of my insert into the window seam and it stays in place nicely. I will repeat this exact process for my next windshield insert.
The rest of my inserts, next time I will ensure to make them so that the internal structure is verticle. I made two inserts where the internal structure is horizontal. While it was less waste of the raw material, I didn’t realize the issue I was going to have when in actual use; they do not like to stay in place as well as the verticle structured inserts without the use of tape (blue painters tape is what I used because there is no residue left behind when removed).
I made all my covers over 6 months ago during the heat of last summer, it was sweltering HOT a few days in a row and both a/c’s were having a hard time keeping up and I was miserable. This worked GREAT and really helped to cool off the interior). With repeated used (almost daily lately) the covers show no signs of needing replacement as of yet.
I made all my window inserts over 6 months ago during the heat of last summer. It was sweltering HOT a few days in a row and both a/c’s were having a hard time keeping up and I was miserable. This worked GREAT and really helped keep heat from transferring into the interior. As it turns out it works just as well to keep heat from transferring to the outside. So far, with repeated used (almost daily lately) the inserts I’ve made show no signs of needing replacement as of yet.
One concern I had was visibility with all the rearward windows (except the front three) covered while trying to drive. As it turns out in real life, I can actually keep all rearward windows covered and drive along fine by use of my mirrors. There is one window that I do notice I miss being able to see out of easily and that is the one directly behind the passenger seat when backing into a location.
